DIY Paper Mache Snowman (With Paper Towels!)
Affiliate links may be used in this post. As an Amazon Associate I earn from qualifying purchases. Read the full disclosure policy here
Let it snow! Add this easy DIY Paper Mache Snowman Craft to your winter craft list this year and enjoy the smiles this whimsical snowman brings throughout the holidays. I had completely forgotten about paper mache and had also forgotten how fun it was to use and mold. Perfect ooey gooey Christmas craft for kids who like hands on crafting!
 Put away newspaper and use paper towels to make this smiling paper mache snowman. An easy Christmas craft for kids for your Christmas decor. #christmas #craftforkids #papermache #snowman")
Paper towels replace newspaper to mold this paper mache snowman. Check out your local dollar store for supplies and let the fun begin! I love the dollar store for craft supplies!
How To Make The Paper Mache Snowman
Materials
White paper towels
Scrap Fleece
Toothpicks
Craft glue
Buttons or pebbles
3 Styrofoam balls (size dictates the size of the snowman, I used 2.5″)
Aluminum Foil
Orange paint or magic marker
Black acrylic paint (if painting pebbles)
White acrylic paint or gesso
I promise this is an easy Christmas craft although the materials list may seem long! Most of the items will already be in your craft stash or can be found at the dollar store.
Directions
- Follow the directions on the Instant Paper Mache mix or make your own paper mache mix. If you have not used paper mache before here are a few tips from the experts.
- Cut off the bottom of one styrofoam ball so the snowman will stand upright. This is styrofoam ball number three.
- Connect styrofoam ball number three with the cut bottom to styrofoam ball number two with a toothpick.
- Repeat connecting the top of styrofoam ball number two to the bottom of styrofoam ball number one (the head of the snowman).
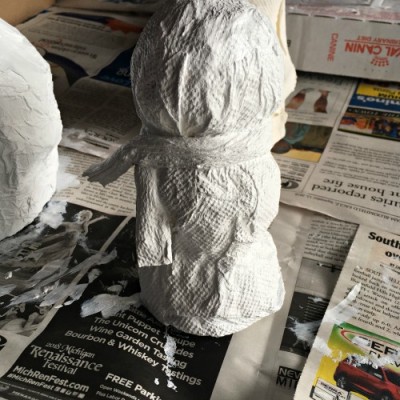
- Gently crumple aluminum foil and mold around the styrofoam balls. The shape of the snowman will be determined by how the aluminum foil is molded to the styrofoam balls.
- Tear the paper towel into pieces.
- Drag the pieces of paper towel through the paper mache mix and apply around the styrofoam balls. The styrofoam balls will form the natural shape of a snowman.
How To Make The Paper Mache Snowman Scarf
- Fold one paper towel accordion style.
- Drag the paper towel through the paper mache mixture.
- Wrap the paper towel accordian around the neck of the snowman.
- Decide upon the location for the ends of the scarf. This snowman has a scarf as if a light wind is blowing. The end of the scarf can be positioned as if blowing in the wind because of the weight of the paper towel.
- Place the snowman on parchment paper or wax paper and let dry at least 24 hours.
Paint The Snowman
Use white acrylic paint and paint the paper mache snowman.
Let Dry.
How To Make The Paper Mache Nose
- Tear a small piece of paper towel slightly larger than the toothpick.
- Drag the paper towel through the paper mache mix.
- Roll the toothpick in the paper towel at a diagonal angle. The size of the nose should be consistent with the size of the face of the snowman. This is something you will “eyeball’.
- Let dry at least 24 hours.
TIP: Use an egg carton or box as a stand for the snowman nose while drying. Simply insert the end of the toothpick of the paper mache wrapped nose upright into the egg carton or box and let dry. A plastic fork as shown below also works well (there is enough room in the nose for a toothpick and a prong of a plastic fork.)
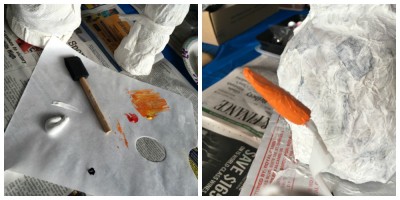
Paint the nose orange with acrylic paint or color with a magic marker.
While The Paper Mache Snowman Is Drying …
While the snowman is drying make the pebble mouth and eyes.
Choose very small pebbles and paint black. The number of pebbles needed will be determined by the size of the snowman. To ensure proper sizing the pebbles should be checked to the snowman head and body. Take a pebble and hold it in front of the location of the snowman’s mouth to judge if the pebble size is accurate.
Use the dollar store to find stick on jewels to make the snowman buttons or use buttons or pebbles.
How To Make The Snowman Hat
Scrap fleece is used to make the hat for the snowman. Follow the directions in the Snowman Candy Bar tutorial to make a no sew fleece hat.
Decorating The Paper Mache Snowman
After the snowman is dry then let the decorating begin!
I begin with attaching the nose first as the eyes and mouth are positioned according to the nose! Cut the end of the nose to the desired length and leave the end of the toothpick extending from the nose.
Position the nose and apply gentle pressure to push the nose into the paper mache head.
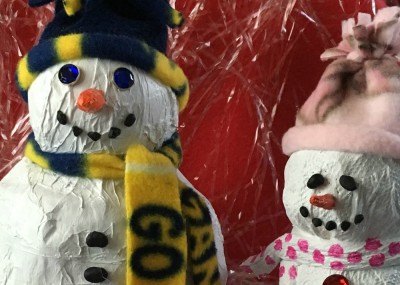
Anything goes as to the materials used for the buttons, mouth and eyes. I used pebbles painted black the the buttons, mouth and eyes. For the buttons I glued stick on jewels.
Brrr! The snowman needs a hat! I put the no sew fleece hat over the head of the snowman. I sized a fleece hat from scrap fleece. Instructions available here for how to make a fleece hat with a glue gun. If the hat does not appear secure it can be glued to the head.
Arms Are Optional
Of course the traditional snowman does have arms. Simply use twigs sized appropriately.
For this paper mache snowman I preferred the streamlined look and did not use twigs for arms. The twigs do not have to be glued as the twigs can be attached by gently pushing the end of the twig into the paper mache body.
Paper Mache Snowman Mason Jar
Isn’t paper mache fun! Combine a mason jar and paper mache to make this snowman which doubles as a snowman and a gift jar! This is a Christmas craft for older children because of the mason jar, but the paper mache part and/or snowman decorating can be done with younger children.
