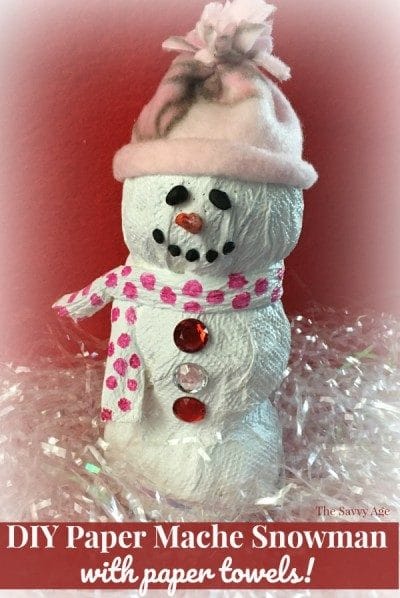
DIY Paper Mache Snowman Mason Jar Gift
Affiliate links may be used in this post. As an Amazon Associate I earn from qualifying purchases. Read the full disclosure policy here
Who remembers paper mache? I do, but very vaguely. I remember how fun and gooey it was to take something as simple as a strip of paper and transform it into an object or animal! The Paper Mache Snowman Craft combines the best of three crafting worlds: paper mache, Christmas mason jar crafts and handmade Christmas gifts.

This is a Christmas crafts for kids (with adult help and supervision) or a fun craft for adults who haven’t used paper mache in awhile. The snowman is very forgiving and can be as perfect or not perfect as the crafter desires.
This Snowman Craft is ooey and gooey! Perfect for kids just having fun slapping on the paper mache strips with all of its ooh and goo and decorating with items from the dollar store or craft stash.
However, paper mache does require a few steps and time for the paper mache to thoroughly dry needs to be built in the preparation.
It is a mason jar Christmas craft that works well over two sessions with the paper mache drying in between sessions.
How To Make Paper Mache Snowman Mason Jar
Materials

Scrap fleece
Duct tape
Craft glue
Aluminum Foil
Buttons or pebbles or very small rocks
White acrylic paint
Orange acrylic paint or magic marker
Black acrylic paint (if painting pebbles)
Directions
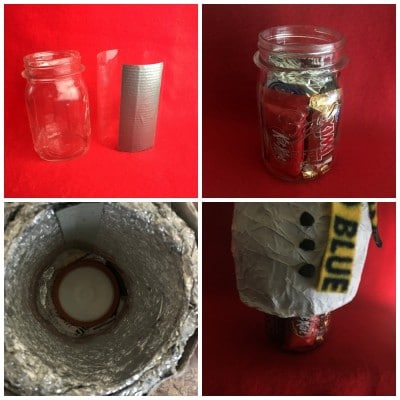
- Cut a 4.5″ by 12″ size of plastic acetate. (I use the 9″ by 12″ sheets.)
- Wrap the plastic acetate around the mason jar.
- Using duct tape or strong tape attach the ends of the plastic to make a roll.
- You will be making a sleeve/roll for the mason jar. The mason jar will be “sitting” inside the plastic sleeve. This protects the jar and the paper mache snowman will be built on the sleeve and not the jar.

- Insert the plastic sleeve over the mason jar.
- Begin molding the snowman with aluminum foil. Slightly crumple aluminum foil and wrap around the mason jar/acetate. The shape of your snowman will be determined by the shape of the aluminum foil.
- Cut off the bottom of the styrofoam ball.
- Glue the styrofoam ball to the lid of the mason jar and set on top of the mason jar.
- Tear or cut newspaper into strips.
- Mix the instant paper mache.
- Drag the newspaper through the paper mache mix and begin building the snowman’s body. The girth of the snowman is personal preference.
- Drag the newspaper through the paper mache mix and cover the head of the snowman. Make sure to add paper mache strips around the neck area so there is not a gap between the head and body of the snowman.
- Let dry at least 24 hours.

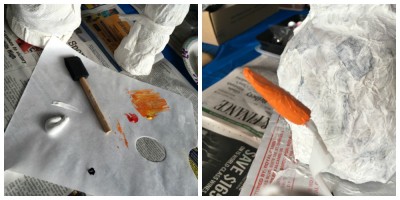
How To Make The Snowman Nose
- Tear a small piece of newspaper slightly larger than the toothpick.
- Drag the newspaper through the paper mache mix.
- Roll the toothpick in the newspaper at an angle.
- Leave one end tip of the toothpick open.
- The size of the nose swill be determined by the size of styrofoam ball used for the head. There is no measuring just eyeball the size needed for the face.

- Stand the nose upright to dry by sticking the open end of the toothpick into an egg carton or cardboard box.
- Let dry at least 24 hours.
- Paint the nose orange with acrylic pint or use an orange magic marker.
How To Decorate Paper Mache Snowman Mason Jar
- Paint the head and body of the snowman white and let dry.
- Paint the pebbles black and let dry.
- Glue the pebbles/buttons down the front of the snowman.
- Attach the nose first before adding the eyes and mouth. The nose will anchor the placement of the eyes and mouth.
- After the nose is attached glue the pebbles below the nose to make the mouth.
- Now glue the eyes on. For this snowman I used stick on jewels as eyes.
- There is no exact number of pebbles or buttons to use for the snowman as it depends upon the size of the pebbles. The pebbles can be replaced with buttons if desired.

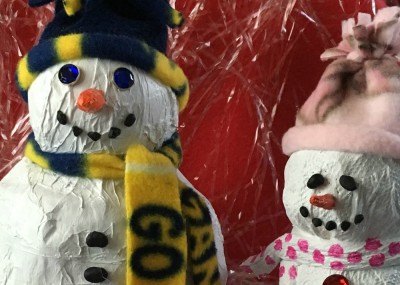
How To Make The Fleece Hat and Scarf
Follow the directions in the Popcorn Wrapper tutorial to make the no sew fleece hat and scarf. This snowman is obviously a college themed snowman for a college fan.
Attach the hat and scarf. If necessary glue can be used to help both stay attached to the snowman.
Lift the snowman off the mason jar.
Fill the mason jar with your favorite homemade Christmas cookies or candy.
There was so much fun and giggles making this snowman (plus leftover paper mache mix) that another paper mache snowman had to be made!
For snowman craft number two paper towels were turned into a cute mini snowman!
More Christmas Crafts
How to Paint Inside Of Mason Jar
Paper Mache Snowman with Paper Towels