Mosaic Garden Art Anyone Can Create
Affiliate links may be used in this post. As an Amazon Associate I earn from qualifying purchases. Read the full disclosure policy here
Yes, you! Mosaic garden art is easy to create and a fun whimsical garden DIY anyone can make with a little labor and garden love. Personalize the garden art project to make a unique and homemade garden gift.

Learn how to create easy mosaic garden art for your yard, landscape and of course the vegetable or flower garden.
How To Make Mosaic Garden Art
Materials
Outdoor garden art or statute (Love these for animals!)
Tile Sealer recommended but optional
Soft white cotton cloth
Directions
It is as easy and simple as “just glue it!” Really! If you like crafts or DIY plus making unique projects this is a garden art project for you!
How fun to personalize a garden statute to give as a gift and add a little sparkle to the yard or garden.
Begin by choosing the garden statute.
For this garden art project I chose one of my favorite animals, an elephant piece of garden art.
![]()
How To Choose The Garden Art Statute
The first consideration is the materials used as the base of the statue. This elephant was made of cement resin which gives a good weight to the piece, but is not so heavy that it cannot be easily lifted or moved.
Remember that adding tiles and grout to a statue will greatly increase the weight of the statute or garden art piece. I want the finished piece of mosaic garden art to be movable by one person. Garden and landscaping changes yearly in my garden and yard so I like to have the flexibility to move the statute easily.
TIP! If purchasing online check the product dimensions and shipping weight to ensure the size and weight is suitable for the what you can handle.
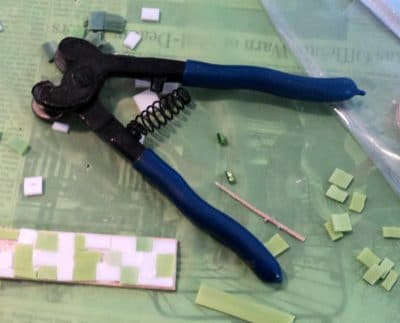
Lay out an old plastic tablecloth on the table. Mosaic tiles can be slippery and bounce! The tiles require nipping and the shards can be very small and sharp. A plastic cloth reduces the bounce factor and helps keeps the shards on the table.
Lay out the tiles. I use paper plates to separate the tile colors. The paper plates with the tiles can then be easily stacked on top of each other for storage between tiling sessions.

Gather popsicle sticks, crafts sticks or paint brushes to help spread the glue.
Choose a section to begin tiling. Glue can dry quickly so apply the glue to a section at a time. A 3″ by 3″ section is a good starting measurement of the section.
Apply the glue to the section of the garden statute. spread the glue in the section with the popsicle stick or paint brush.
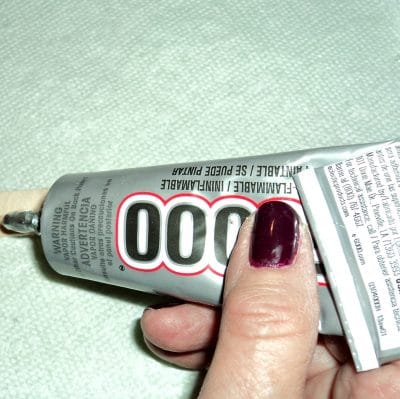
How thick should the glue be applied is a frequent question. The consistency of mustard or mayonnaise on a sandwich is a good starting consistency. But wait that varies for each person you say! This is a starting point and can be adjusted.
Lay the tiles in the section with each edge of the tile ALMOST touching each other. A seam will be created between each tile that will be filled in with grout once the tiling is finished.
There is a bit of wiggle room as the how close the tiles can be glued together. It is also a matter of personal preference as to how wide the grout seam will be. Beginners should aim for each tile ALMOST touching the adjacent tile.
Continue in sections until the entire mosaic statute is covered with tile.
The most labor intensive part of this garden art project were the curves of the elephant and gravity. If you are gluing tiles to a flat surface you can just glue the tile and move onto the next section.
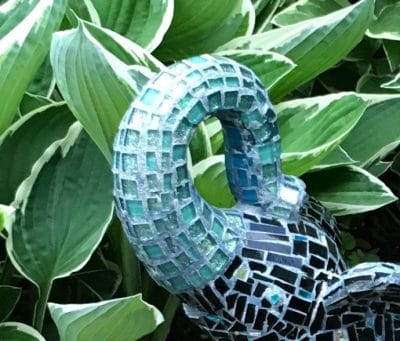
However when curves are involved a little more patience is involved, not much, but a little. For example with the trunk of the elephant I laid the elephant on the side and then glued a few tiles and waited a few seconds for the tile to adhere without falling off due to gravity. Then I let the tiles on the trunk set for about an hour to ensure the tiles were safely glued on the trunk.
It was no big deal, but it does take longer to glue the tiles on.
How To Grout The Mosaic Garden Art
Let the mosaic garden statute dry for 24 hours.
Grout the mosaic garden piece. A nice tutorial is available here.
Grout is very easy to apply and it is forgiving. I frequently use the Mosaic Hack and purchase pre mixed grout from the big box stores. The mix of the grout is then consistent and no worries with mixing grout if this is your first time. Delorean Grey is a nice all purpose and neutral color.
Wait another 24 hours for the grout to set.
Spray with tile sealer. Let the sealer dry for 24 hours.
Polish with a white cloth.
Garden Art Winter Considerations
While you do use sealer to protect your mosaic garden art from the elements, I personally move the mosaic inside for the winter. However the garden art is quite weather resistant and in my garden in the north – I leave the mosaic outside 7-8 months of the year depending upon the first and last snowfall.
Where To Find Pre Cut Glass Tiles
One of my favorite sources for pre cut tiles is Mosaics By Maria. A wide variety of sizes and color are always available and buying pre cut tiles does make any project easier due to less glass nipping.
Another source for pre cut glass tiles and for a beautiful selection of glass sheets is Delphi Glass; however, shipping glass is labor intensive due to the packing required for your glass sheets to arrive safely.
If you are an Amazon prime member, glass tiles are available on Amazon and ship quickly! There are multi colred packs of glass tiles, color coordinated tiles and pre cut tiles of all colors.
More Mosaic Tile Projects
Mosaic Herb Markers