How to Craft Your Dog Into A Mosaic Tile
Affiliate links may be used in this post. As an Amazon Associate I earn from qualifying purchases. Read the full disclosure policy here
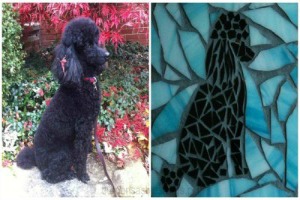
How easy is it to craft your dog into a mosaic tile?
Easier than you think! If you are artsy, crafty or DIY inclined, this is a mosaic craft project in your skill set and as I can attest to, suitable for a novice tiler. Though I admit I happen to be associated with a dog who is silhouette friendly which does help speed the process along.
Preparation For Mosaic Art Tile
Obtain photo of your dog which is silhouette friendly. A side or profile image tends to work best. The image can be of the entire dog or just the head profile.
Size the image on your photo program (any free photo program such as picmonkey or photoscape) works well. Size the photo to match the size of your base (which is the particle board or acrylic.) For my dog I used a 6″ by 6″ square of particle board to create the mosaic. Any size of fiberboard, particle board or acrylic sheet makes a good base for your tile.
Using the tracing paper, graphite paper, transfer the dogs’ photo onto the particle board.
(Easy so far – right! Well, some dogs are easier to photograph than others and we know how difficult it can be to capture that perfect dog image!)
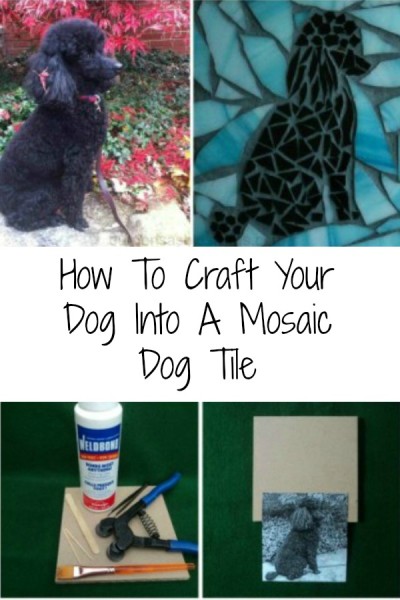
Materials For Mosaic Dog
Glass tiles
Particle Board or Acrylic preferred size.
Optional: tweezers, popsicle sticks, paintbrush, toothpicks to assist in applying glue and tiles

DIY Mosaic Tiles
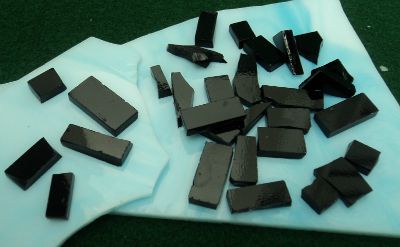
Precutting your tiles will save time. Triangles work very well when crafting a mosaic. Just like a jigsaw puzzle, layout the triangles to make the body of the dog.
For the topknot of my dog, I used a square tile which was then nipped with the glass cutter into smaller roundish balls. There is always as I call it carnage along with a little trial and error when cutting tile; save those pieces and guaranteed you will use them in the future.
Safety! As we know, glass is sharp and a few finger pricks along the way are expected. But please be careful. This is an adult project.
Assemble the silhouette of your dog and now you are ready for the background.
Background Of Your Mosaic Dog
The sky is the proverbial limit when deciding the background. It can seem overwhelming and as this was one of my first beginner mosaic projects, a varied colored tile was chosen as the background. The blue added color and variation to the black dog silhouette and was an easy choice. The background is not cut to any specification. I simply haphardly cut squares of larger tile and then placed the pieces to form the the waves to make a background.
Let dry 24 hours.
https://www.facebook.com/thesavvyage/videos/1192395947515357/
Grouting The Mosaic Tile Dog
My personal motto is…. if you can grout or caulk the bathroom, you can grout a mosaic.
Pre colored grout is easily accessible at the big box hardware store or can be ordered online from the major big box hardware store. I recommend using the pre colored grout for the novice. A neutral grout can be turned into the desired color by adding a grout colorant. Sanded grout is recommended.
Prep your grout to the consistency of peanut butter, smoooosh the grout on the mosaic, take off excess and let dry for about 10-15 minutes (until the glass is cloudy) . Remove any excess grout with a wadded up paper towel. Then use a white cloth to buff the mosaic.
Discard the extra grout – never in the sink – grout is cement and not sink friendly. If you have never grouted before, I promise it is easy easy easy. But I would also do a practice run with mixing the grout prior to get a feel of the water/grout combination which produces the best texture for your mosaic dog. Practice is rewarded.
Voila! Your dog mosaic is complete. Depending upon your base one can paint the back, sign the back, leave it as is.
Where To Buy Mosaic Tiles
Glass tile nippers are available at craft stores, tile stores or your local big box hardware store. I have found the Roberts q.e.p. glass nippers work very well and a tightening tool for the blades is included. The Roberts nipper has taken me through many projects and remains my favorite of the glass nippers I have tried.
Glass tiles can be found on eBay, Amazon, and through private tile distributors. My favorite online store to purchase tiles is at Mosaics by Maria. The tiles are of consistent high quality and are available in a variety of sizes. Triangles are easy to use when creating mosaics and Maria’s offers a large selection of different colors and sizes to nip for your new creation. Square tiles work best to create into triangles to become your new dog mosaic.
I have not had much luck purchasing tiles on eBay. While the cost may be lower or free shipping available, the quality has also been suspect and the quality of the tiles inconsistent. I do shop Amazon frequently for mosaic craft supplies and the prices are very competitive.
Glue, tracing paper, particle board or acrylic sheets are available at your local hardware or big box hardware store. The small particle boards do require cutting by the hardware store; usually a 2′ by 4′ sheet of particle board is the smallest available to purchase (so you may end up with many many squares.) Smaller sizes of hardboard work well also. Acrylic is more expensive, but does come precut in a variety of sizes.
If you are interested in trying mosaics, I would classify the Mosaic Dog Tile as an Advanced Beginner project.
Jump into the world of mosaic tiles and make your favorite dog lover a very happy gift recipient!
Oh that is beautiful and a lovely way to capture your ‘best friend’. My daughter has a miniature schnauzer and I would love to be able to do this for her. Thanks for sharing with us at #OvertheMoon link up. x
Give it a try! Of course I’m biased as a dog lover, but I think she’d love a tile of her furbuddy!
This is so cool! I need to do this for all my animals.
I know you would make an excellent tile of your furry ones!
Oh this is an adorable DIY project.
Thanks ! I know you are creative and could make one of your furball 🙂
I think this is a lovely idea. Now I’m going through photos of my dogs of the past, especially my last one, my pug Sarah, to see if I have mosiac material in any of them! Thanks for sharing!
I’m sure there is mosaic friendly ‘material” there!
Great DIY craft project for dog lovers! I think my dog Valentino would look great in mosaic!
Valentino needs a tile 🙂
I am so excited about this craft! I have two dogs that have crossed the rainbow bridge that need to be immortalized as well as the sweet little dog Violet at my feet who needs to be honored.
They do make lovely remembrances for current and rainbow bridge furry family members..