Mason Jar Lid Christmas Tree
Affiliate links may be used in this post. As an Amazon Associate I earn from qualifying purchases. Read the full disclosure policy here
Yes! Had so much fun making this Mason Jar Lid Christmas Tree! A very easy mason jar lid Christmas craft and a dollar store Christmas craft rolled into one.
After making lighted Christmas mason jars to give as gifts and light up the mantle I had a stack of leftover mason jar lids. A quick trip to the dollar store and this Mason Jar Christmas Tree was made in less than an hour!

This is a Mason Jar Christmas craft for adults and kids. The littles can pick out the stickers and decide upon the pattern. No messy glue, just use the self adhesive stickers.
How To Make Mason Jar Lid Christmas Tree
Materials
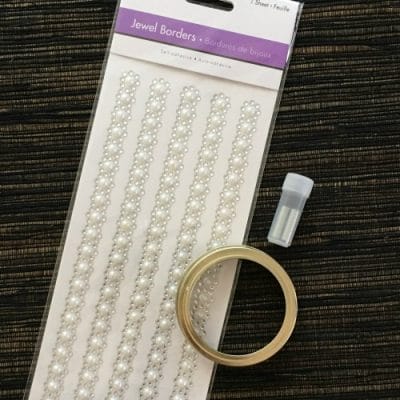
10 or 15 mason jar lids
Self adhesive jewel stickers (from the dollar store) 10-15 strips
Mini magnets (optional)
Ribbon, wire (optional)
Directions
- It is easiest to use the self adhesive jewels which are interconnected on one strip. One strip of jewel stickers for each lid is required.
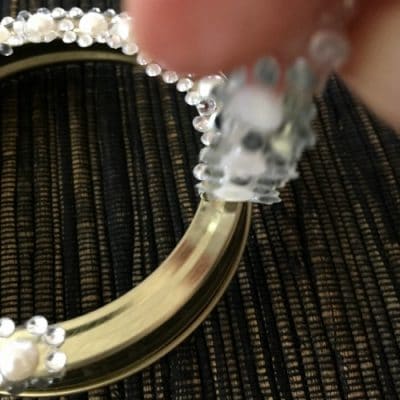
- Remove the entire strip of jewels from the backing.
- Place the end of the strip on top of the mason jar lid. Press gently.

- Wind the strip of jewels along the top of the mason jar lid. Press gently after the jewels are places so the jewel strip adheres to the mason jar lid.
- The jewels will be placed in a circle and will fill an entire 8 ounce mason jar lid with a few leftover jewels.
- The stickers can be easily separated between the jewels with your fingers.
- Repeat for each mason jar lid.

How Many Mason Jar Lids Do You Need To Make A Mason Jar Lid Christmas Tree?
Ten (10) mason jar lids make a very nice sized Mason Jar Christmas Tree. The finished tree measures 11 inches by 11 inches. A tree with 10 or 15 small or medium size mason jar lids makes a flexible Christmas decoration which can be hung in many places throughout the home.
This is my Mason Jar Christmas Tree hanging on the fireplace screen.

How To Assemble The Mason Jar Lid Christmas Tree
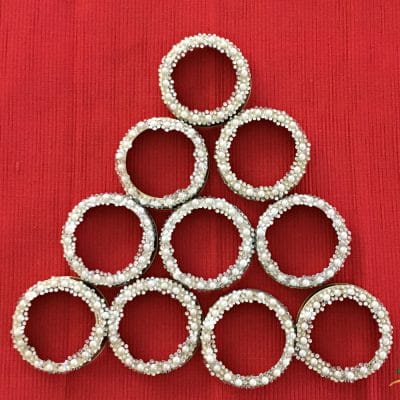
- Line up the mason jars in a triangle following the pattern below.
- Row 1 = 1 lid
- Row 2 = 2 lids
- Row 3 = 3 lids
- Row 4 = 4 lids
- Row 5 = 5 lids, optional
- The rows of lids are stacked on top of each other and spaced to make a triangle.
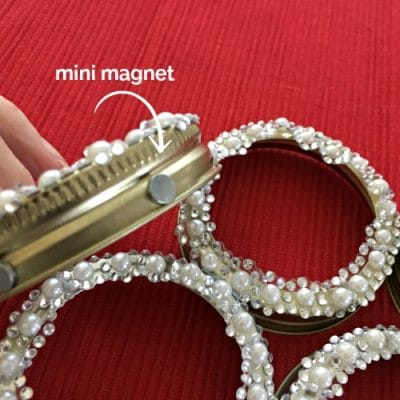
- There are two ways to attach the mason jar lids to each other: Mini Magnets and Tying With Original Thread
- If you have never used these mini magnets, they are a great addition to your crafting supplies. When I first purchased the mini magnets to make refrigerator door magnets I never could have imagined how handy the magnets are to be in the craft stash!
- Attach a magnet to the mason jar lid at intersection where each lid should connect. The magnets will attach the mason jars side by side to each other and top to bottom. The wreath will be almost like a slinky! Very flexible and movable.
- The second way to attach the mason jar lids to each other is to simply tie each lid to the other with invisible thread. I think the same thing about invisible thread as I do with the mini magnets – invisible thread has become a go to in my crafting supplies.
- Tie each mason jar together in the triangle/tree pattern with the knot behind the lid.
- A hanger for the wreath is made by looping invisible thread through the top mason jar and securing with a knot.
- Twine or ribbon can also be used to make the hanger. For this project I used invisible thread because of the design of the wreath with the jewels and I wanted to make it a minimalist tree.
- Decorative ribbon can also be added to the wreath. Are you bow challenged? I am!
- I moved around the bow on the wreath to try different looks and decided to put the bow on the bottom.


What If I Don’t Have Leftover Mason Jar Lids?
I hear you! I created this wreath from extra mason jar lids after making lighted mason jars for the holidays. But perhaps you only have a few lids leftover or were gifted unneeded mason jars. The internet is your friend! You do not have to purchase the entire mason jar – lids are available for purchase as stand alone items.
Decorating for Christmas Mason Jar Lid Crafts
This mason jar lid craft can be as colorful as you want. The selection of self adhesive stickers is huge and do not forget to look first at the dollar store. I am lucky my go to dollar store has a substantial selection of stickers and the stickers on a strip.
The next mason jar lid tree I made was from the individual jewel stickers. This version took alot longer as the jewels had to be removed one by one from the backing and then placed on each lid. I highly prefer using the stickers with each jewel attached to each other in a strip.