Easy Fudge Christmas Trees
Affiliate links may be used in this post. As an Amazon Associate I earn from qualifying purchases. Read the full disclosure policy here
Have you ever turned fudge into a Fudge Christmas Tree? Fantasy Fudge Christmas trees are a fun twist on the traditional holiday fudge squares. Chocolate fudge is actually quite flexible and Fudge Christmas Trees make a delicious Christmas treat, gift or party favor.

How To Make Fudge Christmas Trees
Ingredients
I use the tried and true, melt in your mouth Original Fantasy Fudge recipe. Yes, the original recipe (not the imposter)
- 3 cups sugar
- 3/4 cup butter or margarine
- 2/3 cup evaporated milk
- 2 cups semi chocolate chips (I use Tollhouse for the original recipe)
- 1 jar of marshmallow crème, Kraft jet puffed 7 oz. jar
- 1 tsp. vanilla
- Parchment paper
- Baking Sheet
- Rolling Pin
- Metal cookie cutter
- cooking spray
Directions
- Line baking sheets with parchment paper with the shiny side facing up.
- Follow the directions from the Fantasy Fudge recipe.
- After the fudge has been completely mixed, pour or spoon the 1/2 of the fudge mixture onto the parchment paper on one baking sheet.
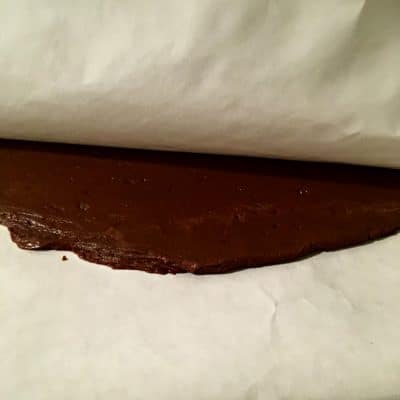
- Place a second piece of parchment paper (shiny side down). A fudge sandwich has been created.

- Careful the fudge is hot!
- Gently press the fudge between the sheets with the rolling pin.
- Flatten the fudge into a 1/4″ rectangle.
- Place fudge into the refrigerator to set approximately 2 hours.
- Once the fudge has set, carefully lift off the top sheet of parchment paper.
- Liberally spray the Christmas Tree cookie cutter with cooking spray. Wipe off excess cooking spray.
- Cut the Christmas trees out of the fudge rectangle.
- Using a spatula lift each tree off the baking sheet and place on a new sheet of parchment paper.
- Return the fudge trees to the refrigerator to set. This will be a quick set. The fudge may become slightly warm and returning the fudge trees to the refrigerator will solidify the tree shape.
- The Christmas trees are now ready to serve, eat or decorate.


Can I Freeze Fudge Christmas Trees?
Absolutely! Follow the same steps in my Freezing Fudge Tips post to freeze the fudge trees for later use or to freeze the trees and decorate in the future.
Fudge cutouts can be made with any metal cookie cutter; however the simple shapes such as trees, bells, hearts do work better!

Fudge Christmas Trees
Ingredients
- 3 cups sugar
- 3/4 cup butter or margarine
- 2/3 cup evaporated milk
- 2 cups semi chocolate chips I use Tollhouse for the original recipe
- 1 jar marshmallow crème Kraft jet puffed 7 oz. jar
- 1 tsp. vanilla
- Parchment paper
- Baking Sheet
- Rolling Pin
- Metal cookie cutter
- cooking spray
Instructions
- Line baking sheets with parchment paper with the shiny side facing up.
- Follow the directions from the Fantasy Fudge recipe.
- After the fudge has been completely mixed, pour or spoon the 1/2 of the fudge mixture onto the parchment paper on one baking sheet.
- Place a second piece of parchment paper (shiny side down). A fudge sandwich has been created.
- Careful the fudge is hot!
- Gently press the fudge between the sheets with the rolling pin.
- Flatten the fudge into a 1/4" rectangle.
- Place fudge into the refrigerator to set approximately 2 hours.
- Once the fudge has set, carefully lift off the top sheet of parchment paper.
- Liberally spray the Christmas Tree cookie cutter with cooking spray. Wipe off excess cooking spray.
- Cut the Christmas trees out of the fudge rectangle.
- Using a spatula lift each tree off the baking sheet and place on a new sheet of parchment paper.
- Return the fudge trees to the refrigerator to set. This will be a quick set. The fudge may become slightly warm and returning the fudge trees to the refrigerator will solidify the tree shape.
- The Christmas trees are now ready to serve, eat or decorate.