Smile! DIY Clown Ice Cream Cone Ornament
Affiliate links may be used in this post. As an Amazon Associate I earn from qualifying purchases. Read the full disclosure policy here
I made this Christmas tree ornament years ago! I do mean years ago as in decades ago as a Brownie … I still recall my Brownie Troop making this Clown Ice Cream Cone ornament as a group activity. I definitely recalled the fun we had on the Brownie leaders driveway spray painting and let the glitter roll! I somehow doubt my troop leaders thought this homemade ornament would have such a shelf life. I thought it would be fun to see if I could replicate the ornament and pass on the tradition.

Unbelievably the original still exists. We have a tree with homemade Christmas ornaments through the years along with special ornaments with memories and stories… I love a homemade tree ( I also like the stylish trees with color coordinated ornaments and themes) so we have both!
Here is the original Clown Ice Cream Ornament. A little tattered and torn, but the memories live on. One of the differences is the little ornament as the nose and I was unable to find ice cream cones that replicate the vintage Clown exactly.

With a few quick substitutions for a few of the original materials the mission began. This is a fun Christmas Craft With Kids as you definitely need to provide adult supervision and a few steps are adult only for obvious safety reasons.
How To Make Clown Ice Cream Cone Christmas Ornament
Materials
Large sugar ice cream cone (must be with a pointed end)
Craft glue ( I use Weldbond for all crafts)
Tinsel garland (color of your choice)
Glitter (any color)
Kid’s Lei (dollar store!)
Medium size red pom poms
White spray paint
Felt scrap
Ribbon
Star Confetti (color your choice)
Large eye needle or tapestry needle
Directions
This part does require adult supervision or pre prep the ice cream cones with the holes for the ribbon hanger. This is the system I think works best and is most efficient. There are quite a few steps to the Clown Ice Cream Ornament, but all the steps are easy and can be done assembly line style with a group.
Ice Cream Cone Prep
Reinforce the edge of the ice cream cone with glue.
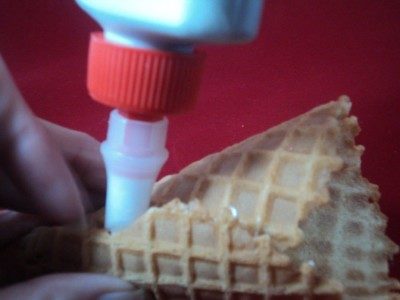
Gently lift up -just slightly- the edge of the ice cream cone. Line a thin layer of glue inside the edge. Press gently and dry.
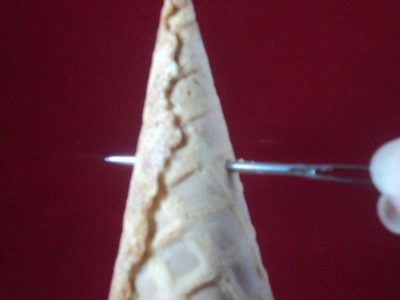
Decide the location of the holes for the ribbon hanger. About one inch down from the point of the ice cream cone is a good place to make the holes.
With a tapestry needle poke a tiny hole through one side of the ice cream cone. The widen the hole slightly by poking the needle into the hole and twisting very very gently.
Take needle and push through the hole across to the side of the ice cream cone.
Gently poke a hole in the ice cream cone then twist the needle side to side to widen the hole (can also use a circular motion).
The waffle cone edge is uneven; if you would like an even edge for the clown hat simply trim the bottom of the ice cream cone with scissors.
Spray And Glitter!
Prepare an area (outside is great if possible!) for spray painting the ice cream cone. Liberally spray the ice cream cone with spray paint.
Immediately sprinkle with glitter and let dry.

TIP: Old egg cartons opened up work nicely to let the cones dry.
Ornament Hanger
Thread the ribbon through the needle.
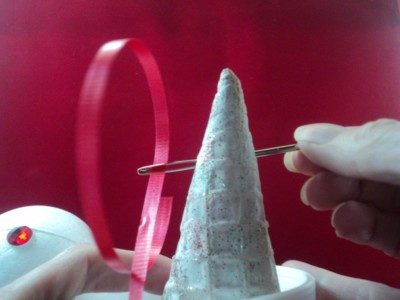
Now continue pulling the needle through the second hole bringing the ribbon with the needle.
Decorate The Clown Face
TIP: Use a disposable cup as a base to decorate the clown face.
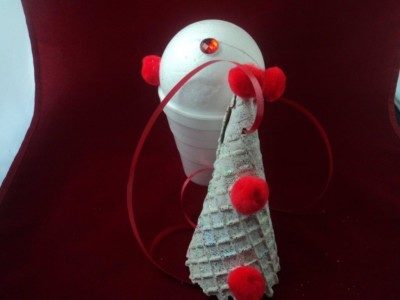
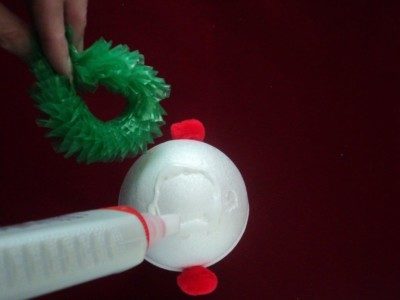
Using a 3 inch styrofoam ball:
Glue the confetti eyes.
Glue the craft jewel for the nose.
Cut out the mouth and cheeks from the red felt. Place and glue to the face.
Add red pom poms for each ear.
Add red pom poms to the cone evenly paced.
Cut lei to a length long enough to make a circle under the bottom of the Styrofoam ball
Assemble
Line the inside of the cone with glue and directly the edge of the cone.
Glue the decorated clown face to the cone. press and dry.
Adjust The Ornament Hanger
Adjust length of ribbon and tie a knot on top of circle.
Christmas Craft For Kids!
As I mentioned I made the ornament in my Brownie troop and with adult supervision this is a fun Christmas craft for kids. Here are a few more Christmas Crafts For Kids …
Walnut Shell Reindeer Ornament
Christmas Popcorn Wrapper Snowmen
That is so cute. I don’t think I could make it though. I am not good at vrafts. They don’t come out well.
Cute idea and fun for children of all ages. This is a craft that I could share with my Grandchildren without any worries or cares……They would enjoy making these, I’m sure.
Wow, that’s so cute! We did the Santa and snowman baby food jars in Brownies. Once they were decorated, we filled them with candy and took them as gifts when we went carolling at the CNIB. The old folks loved them!